Step1: Before starting, Login to your
Linux server and update it. Also install required utilities and JDK
sudo yum
update -y
sudo yum
install wget -y
sudo yum
install java-1.8.0-openjdk.x86_64 -y
Step2: To install Jenkins, First you
need to create Jenkins Repository as Jenkins package is not available in the
default CentOS and RHEL repositories.
sudo rpm
--import https://jenkins-ci.org/redhat/jenkins-ci.org.key
Step3: Once local repository is setup ,
you can install jenkins
sudo yum
install jenkins
Step4: Start and Enable Jenkins Service
sudo service
jenkins start
sudo
chkconfig jenkins on
sudo service
jenkins status
●
jenkins.service - LSB: Jenkins Automation Server
Loaded: loaded (/etc/rc.d/init.d/jenkins;
bad; vendor preset: disabled)
Active: active (running) since Sun 2020-03-22 11:28:21
UTC; 2 months 14 days ago
Docs: man:systemd-sysv-generator(8)
CGroup: /system.slice/jenkins.service
└─6403 /etc/alternatives/java
-Dcom.sun.akuma.Daemon=daemonized -Djava.awt.headless=true -DJENKINS_..
Step5: Open the ports 8080 in OS
firewall.
sudo
firewall-cmd --permanent --new-service=jenkins
sudo
firewall-cmd --permanent --service=jenkins --set-short="Jenkins Service
Ports"
sudo
firewall-cmd --permanent --service=jenkins --set-description="Jenkins
service firewalld port exceptions"
sudo
firewall-cmd --permanent --service=jenkins --add-port=8080/tcp
sudo
firewall-cmd --permanent --add-service=jenkins
sudo
firewall-cmd --zone=public --add-service=http --permanent
sudo
firewall-cmd --reload
Step6: Access the Jenkins Web portal
Access the URL:
http://<Ip-Address-of-your-Server>:8080
Password location: /var/lib/jenkins/secrets/initialAdminPassword
In the next windows Select the option :
Install suggested plugins
Once it is done with plugin
installation. It will ask to create Admin User
Below command will stop the jenkins
service, similarly if you face any issue you can also restart it.
sudo service
jenkins stop/restart
Install
Apache Maven
Step1: Download Apache Maven installer from
its official website and
extract it to /opt/maven
cd /opt
wget
https://www-eu.apache.org/dist/maven/maven-3/3.6.3/binaries/apache-maven-3.6.3-bin.tar.gz
sudo tar xzf
apache-maven-3.6.3-bin.tar.gz
sudo ln -s
apache-maven-3.6.3 maven
Step2: As you have downloaded
precompiled Apache Maven files on your system. Now set the environments
variables by creating new file /etc/profile.d/maven.sh.
sudo vi
/etc/profile.d/maven.sh
export
M2_HOME=/opt/maven
export
PATH=${M2_HOME}/bin:${PATH}
source
/etc/profile.d/maven.sh
Step3: Apache Maven has been
successfully configured on your system. Use the following command to check the
version of installed Maven on your system.
mvn –version
Apache Maven 3.6.1
(d66c9c0b3152b2e69ee9bac180bb8fcc8e6af555; 2019-04-04T19:00:29Z)
Maven home: /opt/maven
Java version: 1.8.0_201,
vendor: Oracle Corporation, runtime: /usr/java/jdk1.8.0_201-amd64/jre
Default locale: en_US, platform
encoding: UTF-8
OS name: "linux",
version: "3.10.0-1062.9.1.el7.x86_64", arch: "amd64",
family: "unix"
Configuring
Java and Maven in Jenkins
To configure Java, provide a Name and
the JAVA_HOME path, or check Install automatically checkbox:

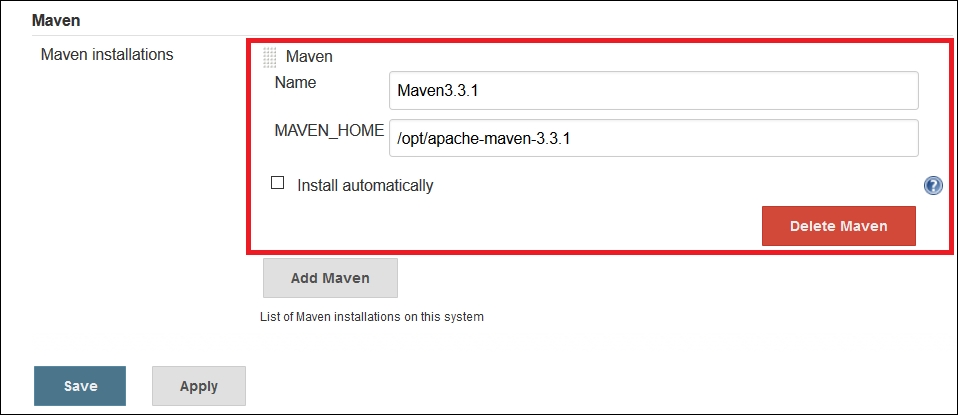
To configure Maven in the Global Tool
Configuration section, provide the Name and MAVEN_HOME path, or check Install
automatically checkbox if it is not installed already.
To install and configure nexus server you can refer here.
Post a Comment
Post a Comment
Thanks for your comment !
I will review your this and will respond you as soon as possible.